Hey there! As a supplier of cooling coils, I've seen firsthand how crucial it is to get the installation right. A properly installed cooling coil can significantly improve the efficiency and lifespan of your cooling system. In this blog, I'm gonna walk you through the steps of installing cooling coils, so you can do it like a pro.
Step 1: Preparation
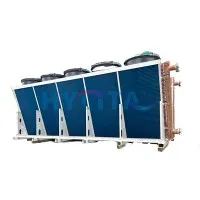
Before you start the installation, you need to make sure you've got everything you need. First off, check the type of cooling coil you've got. We offer a variety of cooling coils, like the Stainless Steel Coil Cooler, Titanium Coil, and Shell and Tube Coil Cooler. Each type has its own installation requirements, so make sure you're familiar with the one you've purchased.
Next, gather all the necessary tools. You'll typically need a set of wrenches, a screwdriver, a pipe cutter, and some sealing tape. It's also a good idea to have a level to ensure the coil is installed straight.
Measure the space where you're gonna install the cooling coil. Make sure it fits properly and there's enough room for airflow. You don't want the coil to be too tight or too loose in the space.
Step 2: Mounting the Coil
Once you've got everything ready, it's time to mount the cooling coil. Start by finding a suitable location. The coil should be installed in a place where it can receive adequate airflow and where it's easy to access for maintenance.
Use the mounting brackets that came with the coil. Secure the brackets to the wall or the frame using the appropriate screws. Make sure the brackets are level and firmly attached.
Lift the cooling coil carefully and place it on the mounting brackets. Align the holes in the coil with the holes in the brackets. Insert the bolts and tighten them using a wrench. Don't over - tighten the bolts, as this could damage the coil.
Step 3: Connecting the Pipes
Now it's time to connect the pipes. First, cut the pipes to the appropriate length using a pipe cutter. Make sure the cuts are clean and straight.
Apply some sealing tape to the threads of the pipes. This will help prevent leaks. Connect the inlet and outlet pipes of the cooling coil to the corresponding pipes in your cooling system. Use wrenches to tighten the connections, but again, be careful not to over - tighten.
If you're using flexible hoses, make sure they're properly secured with hose clamps. Check for any kinks or bends in the hoses that could restrict the flow of the coolant.
Step 4: Electrical Connections (if applicable)
Some cooling coils have electrical components, such as fans or sensors. If your coil has these, you'll need to make the electrical connections.
Before you start working on the electrical part, make sure the power is turned off. Follow the wiring diagram that came with the coil. Connect the wires to the appropriate terminals, and use wire nuts to secure the connections.
Once you've made all the electrical connections, double - check them to make sure they're correct. Then, turn the power back on and test the electrical components to make sure they're working properly.
Step 5: Testing and Leak Checks
After the installation is complete, it's time to test the cooling coil. Turn on the cooling system and let it run for a while. Check the temperature and the pressure gauges to make sure they're within the normal range.
Inspect the connections for any signs of leaks. Look for water droplets or wet spots around the pipe connections and the coil itself. If you find a leak, turn off the system immediately and tighten the connections or replace the sealing tape.
Check the airflow around the coil. Make sure the air is flowing smoothly through the coil. If there are any blockages, remove them to improve the efficiency of the cooling system.
Step 6: Maintenance Tips
To keep your cooling coil working in top condition, regular maintenance is essential. Clean the coil regularly to remove any dirt, dust, or debris that could accumulate on it. You can use a soft brush or a vacuum cleaner to clean the coil.
Check the pipes and connections for any signs of wear or damage. Replace any worn - out parts as soon as possible.
Inspect the electrical components (if applicable) regularly. Look for any loose wires or signs of overheating.
If you have any questions or run into any problems during the installation or maintenance process, don't hesitate to reach out to us. We're here to help you every step of the way.
Why Choose Our Cooling Coils?
Our cooling coils are made from high - quality materials. Whether it's the stainless steel in our Stainless Steel Coil Cooler, the titanium in our Titanium Coil, or the design of our Shell and Tube Coil Cooler, we ensure durability and efficiency.
We also offer excellent customer support. If you need any help with the installation, or if you have any questions about our products, our team of experts is just a message away.
Contact Us for Purchasing
If you're in the market for cooling coils, we'd love to have a chat with you. Our cooling coils are designed to meet your specific needs, whether it's for a small - scale project or a large - scale industrial application. We can provide you with detailed product information, pricing, and delivery options. Don't hesitate to contact us for a friendly chat and start the purchasing process.


References
- HVAC Installation Handbook
- Cooling System Maintenance Guide