


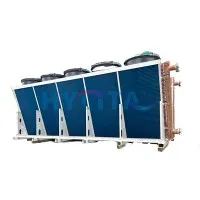
Installing a dry cooler is a crucial process that requires careful planning and execution. As a trusted dry cooler supplier, we understand the importance of providing clear and comprehensive guidance to our customers. In this blog post, we will walk you through the step-by-step process of installing a dry cooler, ensuring that you can complete the installation safely and efficiently.
Step 1: Site Preparation
The first step in installing a dry cooler is to prepare the installation site. The site should be level, stable, and able to support the weight of the dry cooler. It is also important to ensure that there is adequate space around the dry cooler for proper ventilation and maintenance.
- Leveling the Ground: Use a level to ensure that the ground is perfectly flat. If the ground is uneven, use shims or a leveling compound to create a level surface.
- Clearing the Area: Remove any debris, rocks, or other obstacles from the installation site. This will prevent damage to the dry cooler during installation and ensure proper airflow.
- Checking for Ventilation: Make sure that there is enough space around the dry cooler for air to circulate freely. Avoid installing the dry cooler in an enclosed area or near walls or other structures that may block the airflow.
Step 2: Unloading and Positioning the Dry Cooler
Once the installation site is prepared, it is time to unload and position the dry cooler. This step requires careful handling to prevent damage to the equipment.
- Using a Crane or Forklift: Depending on the size and weight of the dry cooler, you may need to use a crane or forklift to unload it from the truck. Make sure that the lifting equipment is properly rated for the weight of the dry cooler and that all safety precautions are taken.
- Positioning the Dry Cooler: Carefully lower the dry cooler onto the prepared site and position it according to the manufacturer's instructions. Make sure that the dry cooler is centered and level, and that it is aligned with the piping and electrical connections.
Step 3: Piping Installation
The next step is to install the piping system for the dry cooler. This involves connecting the dry cooler to the cooling system and ensuring that the piping is properly sized and installed.
- Selecting the Right Pipes: Choose pipes that are compatible with the dry cooler and the cooling system. The pipes should be made of a material that is resistant to corrosion and can withstand the pressure and temperature of the coolant.
- Installing the Pipes: Follow the manufacturer's instructions to install the pipes. Make sure that the pipes are properly supported and secured to prevent vibration and leakage. Use appropriate fittings and seals to connect the pipes and ensure a tight seal.
- Testing the Piping System: Once the piping system is installed, test it for leaks and proper flow. Use a pressure tester to check the pressure in the system and make sure that it is within the recommended range.
Step 4: Electrical Installation
In addition to the piping system, the dry cooler also requires an electrical connection. This step involves installing the electrical wiring and connecting the dry cooler to the power source.
- Hiring a Licensed Electrician: Electrical work should always be performed by a licensed electrician. Make sure that the electrician is familiar with the installation requirements of the dry cooler and that all electrical codes and regulations are followed.
- Installing the Electrical Wiring: Follow the manufacturer's instructions to install the electrical wiring. Make sure that the wiring is properly sized and installed to prevent overheating and electrical hazards. Use appropriate conduit and connectors to protect the wiring and ensure a safe connection.
- Connecting the Dry Cooler to the Power Source: Once the electrical wiring is installed, connect the dry cooler to the power source. Make sure that the power supply is compatible with the dry cooler and that all electrical connections are secure.
Step 5: Commissioning and Testing
After the dry cooler is installed and connected, it is time to commission and test the system. This step involves checking the operation of the dry cooler and ensuring that it is functioning properly.
- Checking the Controls: Make sure that the controls of the dry cooler are set correctly and that all sensors and switches are working properly. Test the start and stop functions of the dry cooler and make sure that it responds to the controls.
- Testing the Cooling Performance: Use a temperature sensor to measure the temperature of the coolant before and after the dry cooler. Compare the readings to the manufacturer's specifications to ensure that the dry cooler is providing the required cooling performance.
- Checking for Leaks and Noise: Inspect the dry cooler and the piping system for leaks and noise. Listen for any unusual sounds or vibrations and check for any signs of leakage. If any problems are detected, address them immediately.
Step 6: Maintenance and Troubleshooting
Once the dry cooler is installed and commissioned, it is important to perform regular maintenance to ensure its continued operation. This includes cleaning the dry cooler, checking the filters, and inspecting the piping and electrical connections.


- Cleaning the Dry Cooler: Regularly clean the dry cooler to remove any dirt, debris, or other contaminants that may accumulate on the fins and coils. Use a soft brush or a compressed air gun to clean the dry cooler.
- Checking the Filters: Check the filters of the dry cooler regularly and replace them as needed. Clogged filters can reduce the airflow and efficiency of the dry cooler.
- Inspecting the Piping and Electrical Connections: Inspect the piping and electrical connections of the dry cooler regularly for any signs of damage or wear. Tighten any loose connections and replace any damaged components.
In addition to regular maintenance, it is also important to be able to troubleshoot any problems that may occur with the dry cooler. This includes identifying the cause of the problem and taking appropriate action to resolve it.
- Identifying the Problem: Use the manufacturer's troubleshooting guide to identify the cause of the problem. Look for any error codes or warning lights on the control panel of the dry cooler.
- Taking Appropriate Action: Once the problem is identified, take appropriate action to resolve it. This may involve replacing a component, adjusting the controls, or contacting the manufacturer for further assistance.
Conclusion
Installing a dry cooler is a complex process that requires careful planning and execution. By following the steps outlined in this blog post, you can ensure that your dry cooler is installed safely and efficiently. As a dry cooler supplier, we are committed to providing our customers with the highest quality products and services. If you have any questions or need further assistance with the installation of your dry cooler, please do not hesitate to contact us. We would be happy to help you with your procurement and installation needs.
References
- Manufacturer's installation manual
- Industry standards and guidelines for dry cooler installation
If you are interested in purchasing a dry cooler or have any questions about our products, please feel free to contact us for a detailed discussion. We look forward to working with you to meet your cooling needs. Our product range includes Horizontal Dry Cooler, Data Center Dry Cooler, and Cooler Radiator Dry Cooler.